Help CenterAcademy Launch Checklist: From Setup to First Student
6 min read
Academy Launch Checklist: From Setup to First Student
A complete 7-step checklist to ensure your branding, courses, payment gateway, and email delivery are 100% ready for student enrollment.
Interactive Setup Checklist0 of 7 steps completed (0%)
Overview
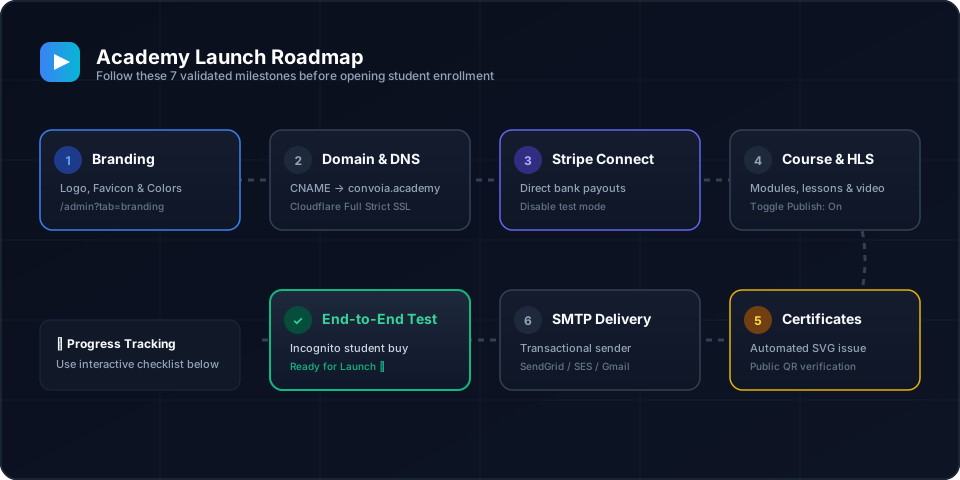
Launching your academy on Convoia Academy is streamlined into a systematic checklist. Follow these 7 essential steps before opening enrollment to your students.
Click to Zoom Screenshot
📷 Academy Launch Architecture Roadmap
Pre-Launch Milestone Tasks
1. School Branding: Upload logo, favicon, and brand theme colors
2. Custom Domain: Configure CNAME DNS record and SSL encryption
3. Stripe Connect: Link Stripe account and verify bank payout currency
4. Course Curriculum: Build modules, lessons, and upload HLS video content
5. Completion Certificates: Customize title, signature, and automated issuance
7. Live Test Student Run: Complete an incognito test registration and purchase
Step 1: Configure School Branding & Visual Identity
1
Navigate to Admin Portal > Branding & Styling (/admin?tab=branding).
2
Upload your School Logo (Recommended format: Transparent PNG or SVG, minimum 400x120px).
3
Upload your Browser Favicon (Recommended format: PNG or ICO, 32x32px or 64x64px).
4
Set your Primary Brand Color (Hex code). This color automatically adapts your student dashboard, buttons, progress bars, and certificate accents.
5
Click Save Changes.
NOTE
Changes to branding reflect immediately across the student portal, login page, and native mobile apps upon next login.
Step 2: Set Up Your Domain
Decide whether you want to use the default Convoia subdomain (e.g., https://yourschool.convoia.academy) or your own custom domain (e.g., https://academy.yourbrand.com). If using a custom domain, consult our Cloudflare & Custom DNS Setup Guide.
Step 3: Connect Stripe for Direct Payouts
1
Head to Admin Portal > Stripe & Payments (/admin?tab=stripe).
2
Click Connect with Stripe to link your Stripe account via Stripe Connect Express.
3
Verify your payouts currency and account verification status.
IMPORTANT
Ensure test mode is disabled on Stripe when going live so student card charges process successfully.
Step 4: Build Your First Course & Upload Video Content
1
Go to Admin Portal > Courses (/admin?tab=courses) and click Create Course.
2
Add your Modules and Lessons.
3
Upload your lesson videos. Our video processing engine automatically splits video files into encrypted HLS streaming segments for fast playback.
4
Set pricing (Free or One-Time Paid or Subscription) and toggle Publish to On.
Step 5: Design Your Completion Certificate
1
In Admin Portal > Certificates (/admin?tab=certificates), toggle on automated certificate generation.
2
Customize the certificate title, signatory name, organization name, and logo.
3
Test the certificate preview in both desktop and mobile viewports.
Step 6: Connect Custom SMTP Email Delivery
Ensure transactional emails (Student Welcome, Password Reset, Certificate notifications) arrive reliably from your brand's domain by configuring SMTP in Admin Portal > Branding & Email.
Step 7: Perform a End-to-End Test Purchase
1
Open an incognito browser window.
2
Visit your public course checkout page (/courses/[course-id]).
3
Register a test student account and complete enrollment.
4
Verify that the course appears in the student's dashboard, video plays smoothly, and completion issues a certificate.